Showing posts with label homebaking. Show all posts

Saturday, November 29, 2008

Chocolate Orange Cake inspired by the Nigellas

Check out this recipe from Nigella Lawson – a flourless chocolate orange cake that is very simple and tastes fantastic.

It’s from her Feast cookbook although there are a couple of printing discrepancies in the recipe. Thank goodness for the internet and indignant bakers for setting it right (eg. the recipe says to cream the butter and sugar even though there is no butter in the recipe). I also mixed the batter by hand rather than in a food processor, and the recipe neglects to mention the baking powder and bicarb soda (I just threw them into the mix anyway).

Anyhoo, apart from boiling the oranges for two hours (after which the house smelt of … oranges), the rest was very easy. I love to decorate and though it is a plain looking cake to begin with, you can go overboard with cocoa powder, shaved chocolate and so on. And, of course, I just had to use my new cake stand from Wheel and Barrow…

The recipe is below, with the bugs corrected.

Chocolate Orange Cake

2 small or 1 large thin-skinned orange, approx. 375g total weight (I weighed the oranges after they had been cooked)
6 eggs
1 heaped teaspoon baking powder
1/2 teaspoon bicarbonate of soda
200g ground almonds (almond meal)
250g caster sugar
50g cocoa
orange peel for decoration, if wished


Put the whole orange or oranges in a pan with some cold water, bring to the boil and cook for 2 hours or until soft. Drain and, when cool, cut the oranges in half and remove any big pips. Then pulp everything – pith, peel and all – in a food processor, or see below if you're proceeding by hand.

Once the fruit is cold, or near cold, preheat the oven to gas mark 4/180C. Butter and line a 20cm springform tin.

Add the eggs, baking powder, bicarbonate of soda, almonds, sugar and cocoa to the orange in the food processor. Run the motor until you have a cohesive cake mixture, but still slightly knobbly with the flecks of pureed orange.

Or you could chop the fruit finely by hand, and with a wooden spoon beat the eggs one by one into the sugar, alternating with spoons of mixed ground almond and cocoa, baking powder and bicarb soda, then the oranges.

Pour and scrape into the cake tin and bake for an hour, by which time a cake tester should come out pretty well clean. Check after 45 minutes because you may have to cover it with foil to prevent the cake from burning before it is cooked through, or indeed it may need a little less than an hour; it all depends on your oven.

Leave the cake to get cool in the tin, on a cooling rack. When the cake is cold you can take it out of the tin. Decorate with strips of orange peel or coarsely grated zest if you so wish.

Makes about 8 slices.

Recipe adapted from Feast by Nigella Lawson


And appropriately (because of the Nigella reference!), this is my entry in Not Quite Nigella’s
Ultimate Chocolate Cake Challenge. Check it out!


Sunday, August 10, 2008

Tangy or sweet - you decide

This is one of my favourite cookie recipes, as the result is a very shortbread-y, sweet biscuit with the fantastic tang of craisins and lemon. In fact, I like to add some lemon juice to the mix, to make it even tangier. It is from the ‘Slice and Bake’ section of the AWW Cookies cookbook.


Lemon Craisin Cookies
makes approx 40

Ingredients
250g unsalted butter, softened
1¼ cups icing sugar
1 tbsp lemon zest, finely grated (plus about 1 tbls lemon juice if you like)
1 tsp vanilla extract
2 cups plain flour, sifted
½ cup rice flour, sifted
¼ cup cornflour, sifted
¾ cup coarsely chopped craisins
1 egg, lightly beaten

Method
Beat butter, icing sugar, vanilla extract and lemon zest in a bowl with an electric mixer until light and fluffy.
Stir in sifted flours. Then add the egg.
Stir until the egg is incorporated and divide the mixture in half.
Knead each half on a lightly floured surface until smooth.
Roll each half into a log and wrap in baking paper or plastic wrap and refrigerate for 1 hour.

Preheat oven to 160°C.
Slice the logs into 1cm discs and place on a baking tray about 3cm apart.
Bake for about 15-20 minutes or until light golden in colour.
Cool on wire rack. Can be kept in an airtight container for about 4 days.

Recipe from ‘Cookies’ (The Australian Women's Weekly mini book 2007)


Monday, June 9, 2008

Put the kettle on for some tea…cake

Here is a recipe for a teacake from Karen Martini (ubiquitous TV and cookbook ‘celebrity’). I’ve never made anything of hers before, and had heard some conflicting views on her recipes, but this one turned out quite well.

Some observations: the cake mix to apple ratio seems quite low (ie. too much fruit, too little flour), but it does balance out in the cake tin. Also, instead of the traditional method of creaming the butter and sugar, the recipe calls for mixing in a food processor. Now, I don’t have a food processor, only a stick mixer with bowl attachment, so I mixed the butter and sugar and then transferred it to a larger bowl to add the flour by hand. The resulting mix is very dense and not as light as creaming with a mixer. Not a problem, though, because the apple makes the cake really moist anyway.

The final result is quite delicious, perfect with a cuppa for afternoon tea.


Apple and Sultana Teacake

4 apples, peeled, cored and finely diced (I used 3 medium granny smith apples, and it was plenty)
¼ cup sultanas
¾ tsp ground cinnamon
2 tbsp brown sugar
½ lemon, juiced
140g butter
140g raw sugar
2 large eggs
140g plain flour
1 ½ tsp baking powder
2 tsp brown sugar


Method

Preheat oven to 180 deg C (fanforced) or 200 deg C (conventional).
Combine apples, sultanas, cinnamon, brown sugar and lemon juice in bowl. Stir and set aside.
Place butter and raw sugar in a food processor and process until well combined.
Add eggs one at a time and whiz until combined.
Sift flour and baking powder together in a bowl.
Add flour mixture to butter mixture and whiz until smooth.
Spread half the cake mix in the base of a lined loaf pan (I used a 10 x 23cm tin).
Top with half the apple mix.
Spoon over the remaining cake mix and top with the remaining apple mix.
Sprinkle with brown sugar and bake for 60 mins or until cooked (the top may burn, so I took it out after 50 mins and it was already cooked).
Cook for a few minutes in tin before turning out and eating warm (yum!)

Adapted from Karen Martini’s recipe in Sunday Life magazine.


Sunday, May 11, 2008

...Mmm, luscious moist delicious banana bread…

Two years ago, Cyclone Larry wiped out 90 percent of the banana crop in North Queensland, and bananas hit the unbelievable price of over $12 a kilo (when you could find any). But the crops are now flourishing again and bananas are plentiful and life is good.


So, even though I don’t normally eat bananas, the price makes me pick up a couple every time I see them in the supermarket. So, what do you do with them? One of my favorites is to make a hot caramel sauce to drizzle over. The other is to make…banana bread. Admittedly, the banana bread idea was spurred on by Not Quite Nigella’s brilliant
banana bread bake off, so here is my entry.


I went through my collection of Donna Hay and delicious magazines to find a good recipe, and this one stood out because it filled my criteria of a) not too many ingredients and b) using melted butter instead of creaming it (good because the weather is getting cool and butter takes ages to soften).

And the result is fantastic – it is a mouth-watering bread that is not too heavy, studded with walnuts (can be substituted with craisins/cranberries). Straight out of the oven, it is great with more butter gently melting into it. Or it can be eaten cold (again with slatherings of butter - not exactly healthy, but all things in moderation, etc!).

I suppose the final word goes to my mother, who has sampled banana bread in cafés all across town – she said of mine: ‘very nice, very moist’. I’m a happy daughter! PS: Happy Mother's Day.


Banana bread

Ingredients (serves 8)

1 3/4 cups (260g) plain flour
1/2 tsp ground cinnamon
1 tsp baking powder
1/4 tsp bicarbonate of soda
2/3 firmly packed cup (150g) dark brown sugar
100g walnut crumbs or chopped walnuts
3 large over-ripe bananas
2 large eggs, lightly whisked
1 tsp vanilla extract
100g unsalted butter, melted, cooled


Method
1. Preheat the oven to 175°C. Lightly grease an 11cm x 22cm loaf pan and line base and 2 long sides with a sheet of baking paper, leaving 2cm overhanging.
2. Sift flour, cinnamon, baking powder, soda and 1/2 teaspoon salt into a bowl with the brown sugar, then add the nuts.
3. In a separate bowl, mash the bananas with a fork or potato masher, then stir in the eggs, vanilla extract and cooled melted butter. Using a wooden spoon, fold the wet ingredients into the dry ingredients until they're just combined - don't overmix.
4. Pour cake batter into prepared pan. Place in the oven and bake for 1 hour or until golden brown and a skewer inserted in the centre comes out clean. Cool the loaf in pan 10 minutes, then turn out onto a wire rack to cool. Cut into 8-10 slices.

This banana bread will keep in an airtight container for up to 3-4 days, or frozen in individual slices for up to 1 month.


Recipe from delicious. September 2007


Truly delicious!

Friday, February 15, 2008

…best ever Cheesecake

If recipes were clothes, then this one would be ‘vintage’. It’s been my favourite cheesecake recipe (since 1989) because it doesn’t have a kilo of cream cheese like a lot of others. I’ve changed it to include light as well as full fat cream cheese, and I use light sour cream as well. There’s no difference to the taste as a result; in fact, I think the texture is finer.
It’s also delicious spread with passionfruit curd before serving.

Cheesecake
Serves 6-8

The base:
1 cup Arnotts Scotch Finger or Nice biscuit crumbs (about 9 Nice biscuits – crush in food processor)
6 tablespoons melted butter
3 tablespoons sugar

The filling:
375g cream cheese
2 eggs
½ cup sugar
1 tablespoon vanilla essence
1 cup light sour cream

To make the base:
Line a 20cm springform cake tin with aluminium foil, leaving an overhang to lift out the cheesecake. Combine all ingredients and press firmly into the base.

To make the filling:
Beat the cream cheese a little until light and fluffy. Add the eggs, sugar and vanilla and beat until smooth. Stir in sour cream and mix well. Spoon into the crust and bake in the centre of a pre-heated 120 deg C oven for 35 minutes or until the filling is set.
Remove from the oven and cool in the tin on a cake rack.
Serve at room temperature.


Adapted from Vogue Entertaining Oct/Nov 1989. So last century, but so good.

Monday, February 4, 2008

...the recipe where I forgot to add the egg

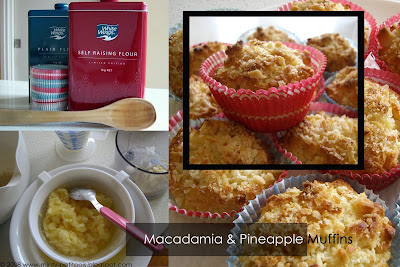
I usually bake on weekends, when there’s more time, so here’s something I prepared a few weeks ago. These muffins are beautifully moist and healthy-tasting, but in a good way.
They even tasted fine after I forgot to put in the egg! I mean, how do you forget something like that?
The muffin liners are by Donna Hay.


Macadamia and Pineapple Muffins
Makes 12


Ingredients
2 1/4 cups (335g) self-raising flour, sifted
1/2 cup (110g) raw sugar, plus 1 tbs extra
1 cup chopped macadamia nuts (use food processor)
125g unsalted butter, softened
2 tbs honey

1 cup (250ml) buttermilk
440g canned crushed pineapple in natural juice, well-drained
1 egg, lightly beaten

Method
1. Preheat oven to 190°C (not fan-forced).
2. Line a 12-hole muffin pan with paper cases.
3. Place flour and sugar in a large bowl with half the macadamias, then set aside.
4. Melt butter with honey in a small saucepan over low heat. When melted, remove from heat and add the buttermilk and pineapple.
5. Stir to combine, then add egg. Make a well in centre of dry ingredients and pour in buttermilk mixture. Fold in to just combine, then pour mixture into muffin pan.
6. Combine remaining nuts with extra tablespoon of raw sugar and sprinkle over the muffins. Bake for 20-25 minutes, until golden and cooked through.


Remove from the oven and allow to cool for 5 minutes.

Recipe adapted from delicious. (issue October 2004)

Ooh, look at this, too...